LED Control System & LED Display Screen Solution Provider - Shenzhen Linsn LED Co.,Ltd.
Telephone:+86-755-3292-5789

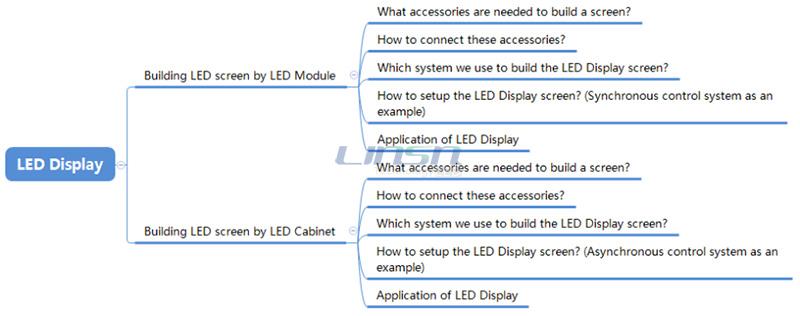
Here’s some information we wanna share with you: How to make an LED Display and set it up by novastar led control system? Many clients want to DIY a led screen by themselves, but they are confused, especially for newcomers,we got a lot of led display troubleshooting from our customers.
So to let you know more about led display assembling and configuration,we will take you to understand it from the following parts:
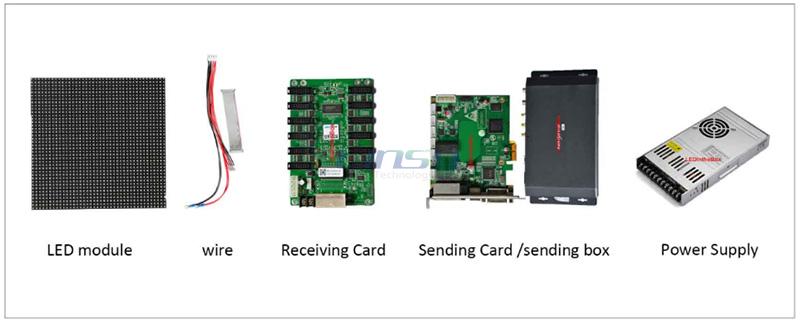
If you can make the structure or cabinet in your local place or wanna save the led display cost, the below accessories will be your necessity. You need to assemble it by yourself after receiving it:
led sending card/box + Signal cable + led receiving card + Signal cable + led display module + Power supply + Power cable to card/box and modules
Or you can choose the assembled LED Display Cabinet, as follows picture shows:
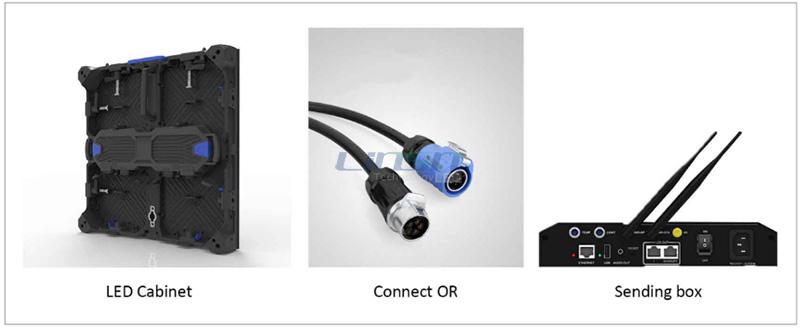
No matter which one you choose, you need to make the mounting structure. Meanwhile, consider the shipment and cost, it’s better to make it in your local area.
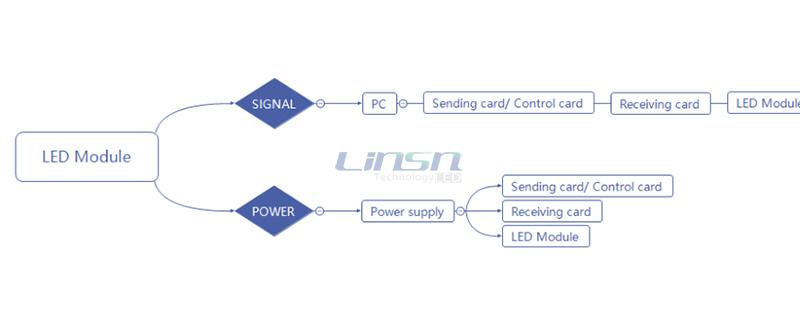
For LED Module, here are two connection parts: Signal and Power.
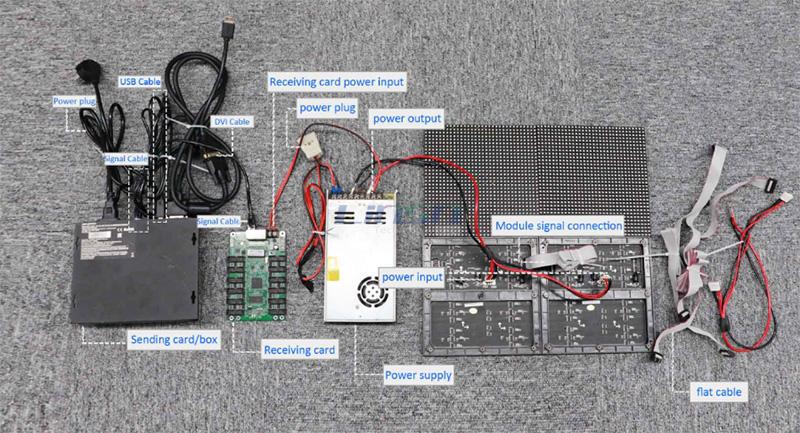
>> The connection is based on Synchronous led control system.
>> USB Cable: must connect with computer, used exclusively for debugging.
>> Usually, for the receiving card, the width should not exceed 128 dots, but it will be changed according to the actual situation.
For LED Display Cabinet, it’s easier than LED Module, the detail as follows:
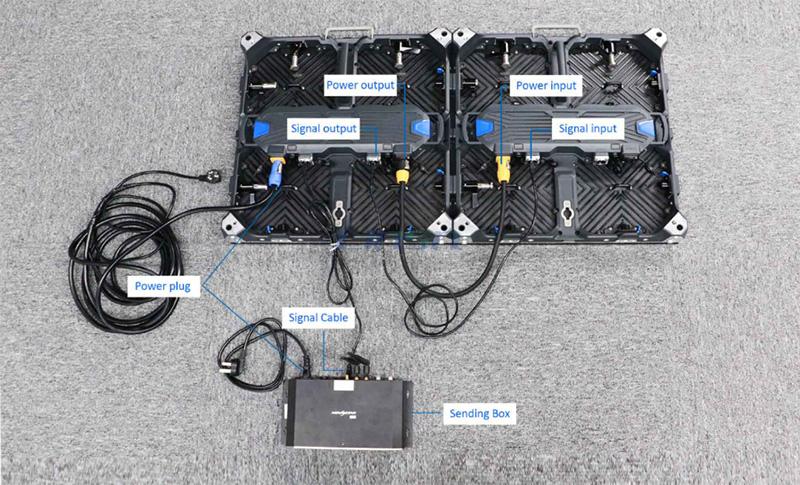
>> The connection is based on Asynchronous led control system.
According to the different control methods, the system is divided into two categories: Asynchronous and Synchronous control system.
>> Asynchronous (WIFI/4G): Novastar, Huidu, Colorlight, Xixun, and so on.
>> Synchronous (Computer): Novastar, LINSN, Colorlight, and so on.
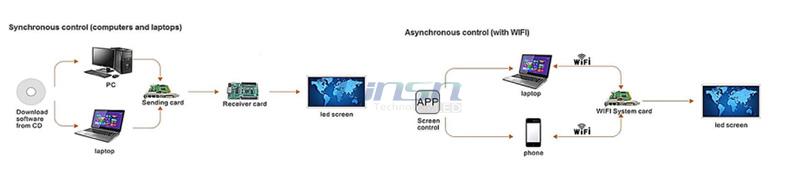
1. Asynchronous mainly controls the screen by WIFI/4G after setup theLED Display.But that doesn’t mean you can’t connect to the computer to set up the led screen as well.
2. Asynchronous also means that LED Display can’t be played in real-time.
3. If your screen is under 230W dots, then you can adopt Asyn or Syn control system. But if over 230W dots, you can only use the Syn control system.
We guess you might don’t know how to choose the detailed control system, it’s alright, just keep one point in your mind:Choose the led receiving card and the led sending card according to the load.
Here is a data table for reference:

After the cable connection work of the LED Display, the main task turns to set up the LED Screen.
This part will show you How to Set up a Synchronous LED Control System with NovaLCT Software firstly.
In this step, 3 points are the most important:
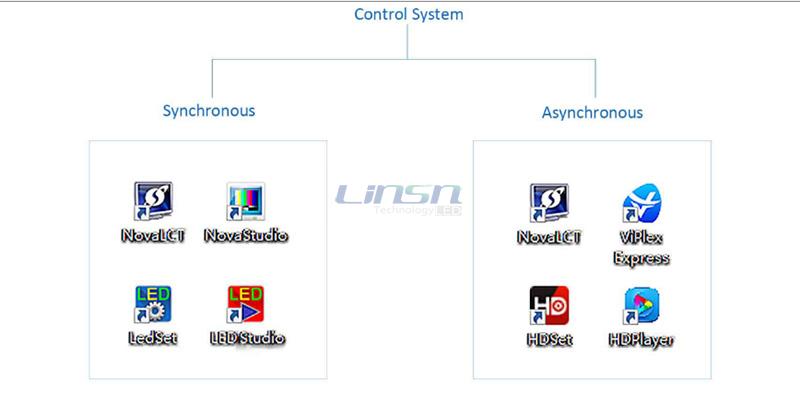
1. Software.
>> NovaLCT
>> NovaStudio (Download from: https://www.novastar-led.cn/index/search/index.html?_q=studio)
2. Configuration files debug.
>> The RCG file will be sent to customers by email while it has been sent to the receiver card during the aging test. So it’s not a thing we need to worried about. But if you wanna know how to set up this file by yourself, we will talk about that in another article.
3. Connection files debug. The detailed settings as follows:
We will show with the example with modules in P6 pixel, 192mm*192mm, 32*32 dots, 2*2 arrangement. 1 sending card, 1 receiving card.
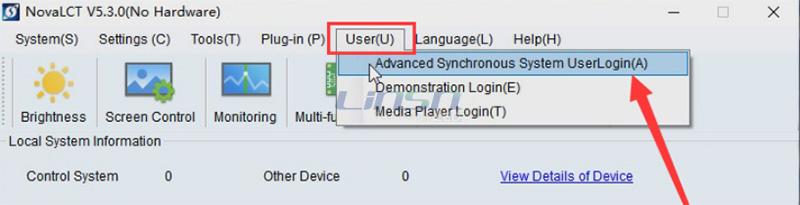
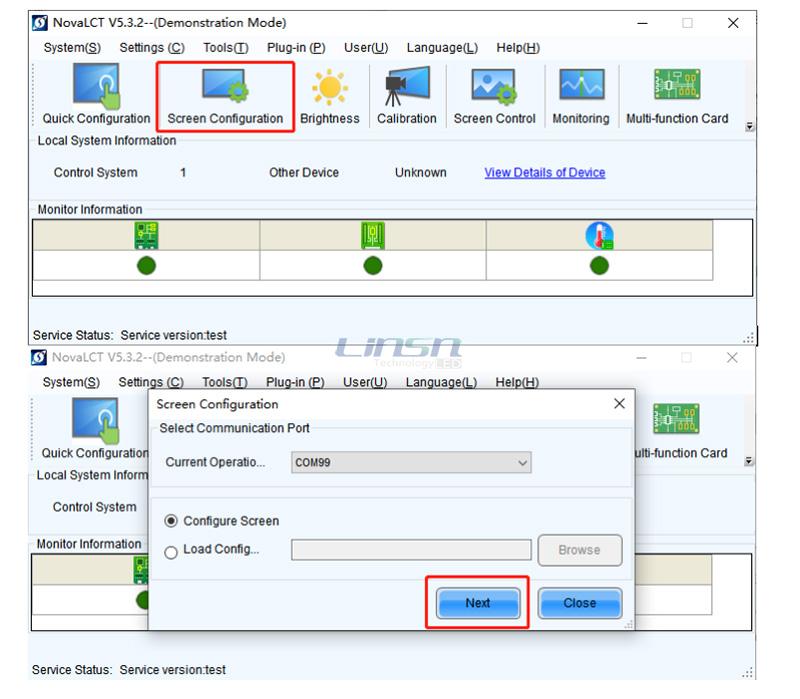
>> Login your NovaLCT software.
Click Users option and choose the Advanced Synchronous System UserLogin.
The password is “123456”.
>> Then you can see your interface showing like below. Click Screen Configuration and go Next.
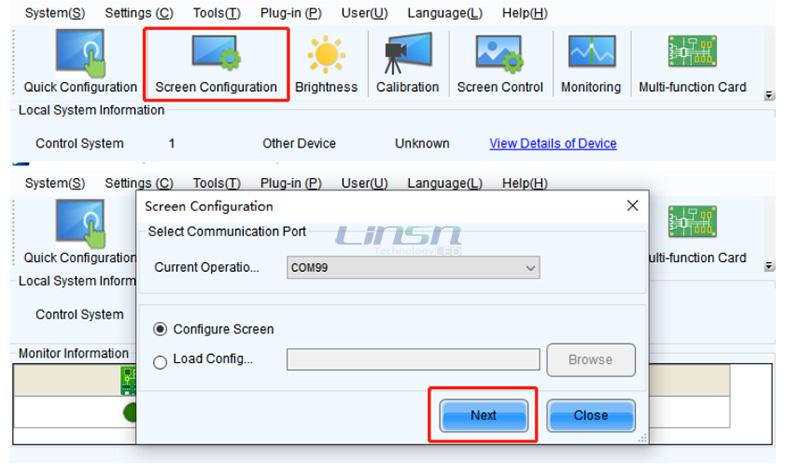
>> Choose the receiving card, read back the RCG File.
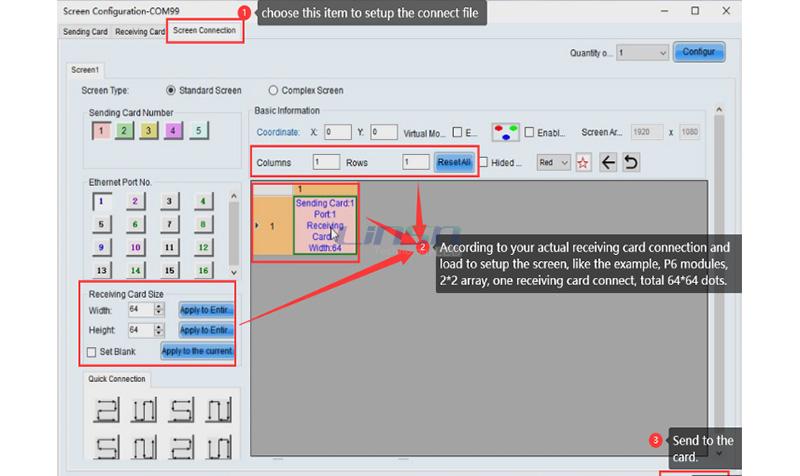
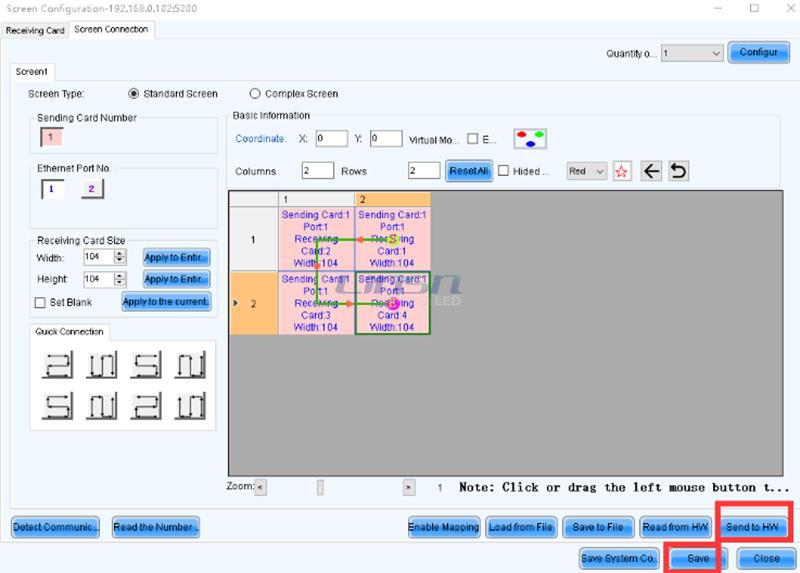
>> Click Screen Connection to set the connection files.
The entire file is set based on the number of receiving cards and the actual load of the card.
For example, Each card: 104*104 dots, total 4pcs cards, 2*2 array, then the setup as following:
- Columns/ Rows: 2
- Receiving card size: 104*104
- Connect: “C” Or “ ɔ”.
>> Come to the right side, As we used only 1 receiving card, the Columns and Rows just all type in the figure. Don’t forget to click the Reset All and Click the Pink Block Chart to finish your set.
>> Click Send to HW and then Save.
Congratulations! Now you have successfully set up your Synchronous LED Display System!
Secondly,it comes to How to Set up an Asynchronous LED Control System with NovaLCT Software.
l Connect your computer with TB3
l Open the ViPlex Express and connect your network.
l Back to the NovaLCT to set up the screen.
l Choose the Screen configuration-Next, Click to the page of the receiving card.
l Read back the RCFG file from the receiving card and send it to the screen.
l Setup the connection file.
1. What do you need to prepare before setup?
>> Computer or laptop
>> Nova T-series multimedia player(TB3 for example)
>> Software - NovaLCT
>> Software - ViPlex Express (Download from: https://www.novastar.tech/downloads/software/)
2. Detailed Setup Procedure
Example case: P4.81 500*500mm cabinet build 1*1m screen, Cabinet resolution: 104*104 dots, Screen resolution: 208*208 dots
>> Connect your computer with TB3
Search TB3’s WiFi (name started with AP) and connect. (WiFi password:12345678.)

>> Open the NovaLCT software and log in.
Click User--Media Player login (User Name: admin; Password: 123456)

>> Open the ViPlex Express and connect your network.
(Keep the NovaLCT online when setup the ViPlex Express)
l Open ViPlex Express and click refresh. Check whether there is 1 online or not.
l Click Terminal Control to find the network configuration.
l Find your network and connect it.
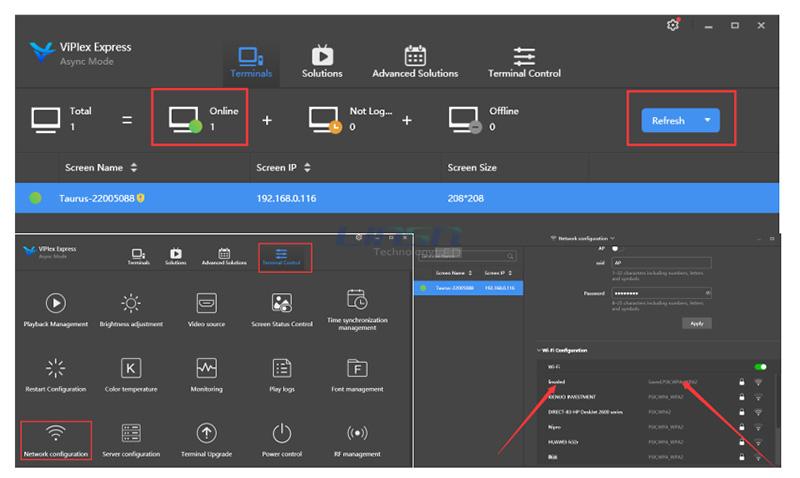
After set up the ViPlex Express,The screen/TB3 and your computer are all connected. Thenyou need to get back to NovaLCT to set up the screen.
>> Back to the NovaLCT to set up the screen.
>> Choose the Screen configuration-Next, Click to the page of the receiving card.
>> Read back the RCFG file from the receiving card and send it to the screen.
>> Click Receiving Card--Read from Receiving Card--Send to Receiving--Save
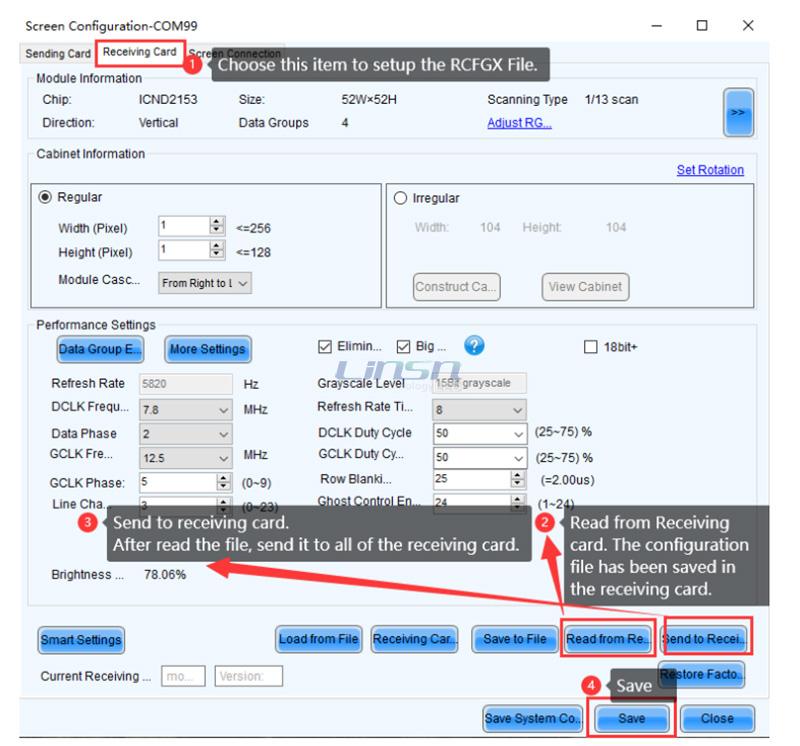
For the receiving card,there’sno need to set it up, we have configured it before delivery, and alsocansend you the RCFG file if needed.
Setup the connection file.
Connection file setup ways depends on your actual screen connection path. (See from the front of the screen). Then send it to HW (Hardware), and save.
(Each data cables, max support 650000 dots, pay more attention to this point. )
Meanwhile, If using the Asynchronous control system, even if there is only one receiving card, you need make the connection file, but the Synchronous can be omitted.
After finishing these settings, you need to go back to the Viplex to set up the show/image/video or others.
Based on those explaination, could you get a roughly understand of the Synchronous and Asynchronous control system now? If still have questions, just contact us. We have relevant video for you.
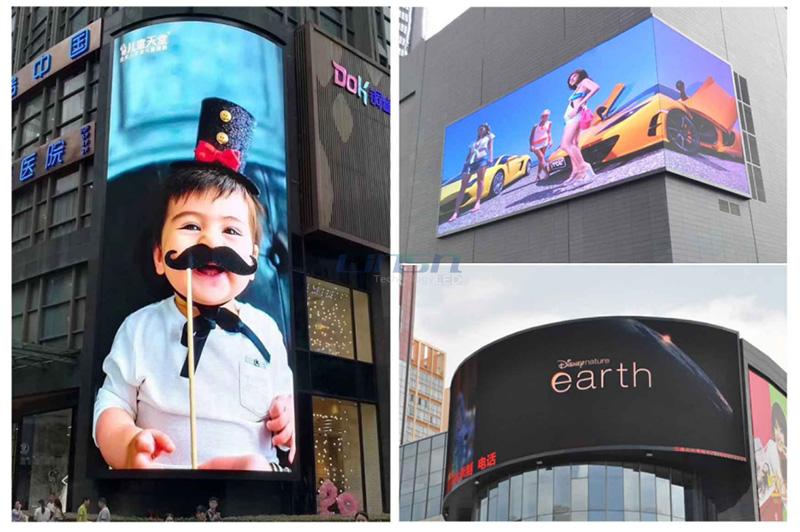
As we all know the LED modules and cabinets earn relatively better praise according to their ample application occasions and flexible installation methods.
It can be installed in almost every size if you want.
And based on the development of special shape design, the LED screen can be made into different forms from the common ones. ( Like Hexahedron screen, Ball shape screen, Arched screen, and many other types as you could imagine.)
Here we’d like to show you some common application scenes of LED display.
>> LED Display Modules:
If your led video screen is a small size one, or you can make/ get the bracket your local market, choose LED modules to assemble your screen is suitable and cost-saving.
It doesn’t matter if you’re a green hand in the LED field, we have an online tech guide and installation guide for our customers.
>> LED Display Cabinets
According to the installation and application ways, LED cabinets can be classified into fixed installation type and rental type.
(1) Fixed Installation LED Display Type
This type of LED cabinets is to be designed for a one-time installation. Usually, after the assembling of it, it won’t be moved or dismounting anymore in theoretical.
It can be used in advertising board, railway or airplane information showing board, fitness room screen, football field screen, KTV/ movie theater/ bar, and other similar occasions.
Or if you have other fancy ideals for their installation, it’s also OK, just do for it and make it come true. : )
(2) rental led display Type
Just as its name implies, the rental type LED cabinets can be moved and installed frequently. It was designed to be an easy installation, lighter and thinner. And with tech development, we are all devoted into design and produce a newer model for easier assembling.
Usually, these are applied for stage use, like concerts, product presentations, news conferences, car exhibitions, open cinemas, and so on.
Any other questions you have about the LED cabinets installation or led display module price, you could contact us online, or email us, we will support you timely.
Phone/Whatsapp: +86-137-8705-0055
Skype: leddisplays
Sales E-mail: sales@linsnled.com
Wechat:
Contact:LINSN LED
Phone:+86-137-8705-0055
E-mail:sales@linsnled.com
Company:Shenzhen Linsn LED Co.,Ltd.
Add:Building 11,SanLian Industry Park,SongBai Road,BaoAn District,Shenzhen,China.